blog
Open Source Learning Series: Getting started with Envoy, SPIFFE, and Kubernetes
The following article was initially published by Greymatter.io developer Zoe McCormick to her personal medium blog. It has been republished here with her permission. The following guide provides a walk-through explaining how the open-source Envoy Proxy and Spire can work together. For more information on about automation within the Greymatter.io platform, please contact us at info@greymatter.io.
June 28, 2021
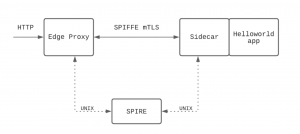
This guide will get you started with SPIRE and Envoy SDS by walking through the deployment and configuration of an edge Envoy proxy and an Envoy sidecar in front of a simple app, configured to communicate with each other using SPIRE for mTLS.
A quick intro
SPIFFE, the Secure Production Identity Framework for Everyone, defines a set of standards to provide secure identities to individual workloads and can be leveraged to create a zero-trust security model within your microservice architecture. The SPIFFE runtime environment, SPIRE, is available to implement it.
I’ve recently spent time integrating SPIRE into the Greymatter platform, and I learned a lot about configuring and troubleshooting both SPIRE itself and its interaction with Envoy. With that experience, in this post, I hope to provide a quick and easy guide for getting started with SPIRE on Kubernetes and how to configure Envoy SDS to use it for service to service mTLS.
If you’re not sure about Envoy and/or SPIFFE/SPIRE, read more on SPIFFE — what it is, how it works, and who is using it here, and check out Envoy.
The setup
Prerequisites
To follow this guide, have the following:
- A running Kubernetes cluster with access to the environment. Note that this deployment of SPIRE requires host networking access.
- Clone the repo for this guide:
git clone https://github.com/zoemccormick/spire-envoy-example
zoemccormick/spire-envoy-example
Step 1: Install SPIRE
Note on the SPIRE Kubernetes Workload Registrar
For this deployment, we will use the Kubernetes Workload Registrar service provided by SPIRE.
This service runs alongside the SPIRE server and uses a ValidatingWebhookConfiguration to watch pods in the Kubernetes cluster as they are created. As pods come up, the registrar tells the server to create their unique identities, based on their pod information.
This is useful for automatic entry creation rather than manual and hardens the attestation process by ensuring selectors (the specifications SPIRE uses to determine whether a workload can access a particular identity, see the docs) are properly added to identities.
Configuration
There are many complex internals for the server and agent configurations that I won’t go into detail on in this post — but the SPIRE project provides docs, examples, and information on each element. See here for full server configuration docs, and here for the agent.
It should be noted that the certificates used by the server & agent for this guide are generated and checked into the repo — in a production environment, these would need to be changed.
The pieces of SPIRE server/registrar configuration that are relevant to the future Envoy SDS configuration are:
trust_domain: configured for the server and determines the format of the generated SPIFFE IDspod_label: configured for the registrar service and determines if a SPIFFE identity is created for a new pod and (if so) the second piece of the format
With these configurations — the server will generate SPIFFE identities with format spiffe://<trust-domain>/<pod_label-value>. This value is how Envoy’s request their identities from an SDS (which in our case is SPIRE).
For our example, we can see that we are using the trust_domainvalue quickstart.spire.io, and pod_label value spire-discover. For any pod created that has the Kubernetes label spire-discover, say spire-discover: example-service, it’s SPIFFE identity will be:
spiffe://quickstart.spire.io/example-service
Install
With the above configurations noted, install the server:
kubectl apply -f spire/server_template.yaml
Run kubectl get pods -n spire -w and wait for the spire server pod to come up with 2/2 containers. This is a limitation of using the registrar service and is necessary to ensure the service is watching to create identities when the spire agent pods are created.
When the server is 2/2, apply the agent:
kubectl apply -f spire/agent_template.yaml
The agent runs in a daemonset, so you should see a pod for each node of the cluster.
Step 2: Install services
Configuration
For this example, we will create a deployment running an edge Envoy proxy for ingress, and a deployment running a hello world service with a sidecar. To create these proxy images, I followed this guide from Mark Vinzce and pushed the docker images used in the deployment files.
Both Envoy proxies in this example, edge, and the sidecar, will have the following cluster:
- name: spire_agent
    connect_timeout: 0.25s
     http2_protocol_options: {}
      load_assignment:
         cluster_name: spire_agent
          endpoints:
             - lb_endpoints:
                - endpoint:
                     address:
                        pipe:
                           path: /run/spire/socket/agent.sock
We’ll point to this cluster in the TLS context for either a listener or cluster in order to tell Envoy SDS that it should talk to the spire agent over a UNIX socket at /run/spire/socket/agent.sock to get its certificates.
Note that there is a volume mount on each deployment creating this socket.
Edge proxy
The full edge Envoy proxy configuration can be found here. The important piece to talk through for this guide is the SDS configuration.
First, see that the edge deployment contains the label spire-discover: edge-proxy — so we know it’s registered SPIFFE identity will be:
spiffe://quickstart.spire.io/edge-proxy
Now inspect the configuration. The proxy has a listener at port 10808 that is routing http traffic with path prefix "/" to the cluster named helloworld.
This cluster helloworld points at the sidecar at port 10808.
Take a look at thetransport_socket for this cluster. This is where the connection from this edge-proxy to the sidecar in front of the helloworld app is configured to use its SPIFFE certificates.
transport_socket:
     name: envoy.transport_sockets.tls
     typed_config:
       "@type": type.googleapis.com/envoy.extensions.transport_sockets.tls.v3.UpstreamTlsContext
       common_tls_context:
         tls_certificate_sds_secret_configs:
         - name: spiffe://quickstart.spire.io/edge-proxy
           sds_config:
             api_config_source:
               api_type: gRPC
               grpc_services:
                 envoy_grpc:
                   cluster_name: spire_agent
         combined_validation_context:
           default_validation_context:
             match_subject_alt_names:
               exact: spiffe://quickstart.spire.io/helloworld
           validation_context_sds_secret_config:
             name: spiffe://quickstart.spire.io
             sds_config:
               api_config_source:
                 api_type: gRPC
                 grpc_services:
                   envoy_grpc:
                     cluster_name: spire_agent
         tls_params:
            ecdh_curves:
             - X25519:P-256:P-521:P-384
The tls_certificate_sds_secret_configs configuration is telling Envoy SDS to ask the cluster spire_agent for the SPIFFE identity spiffe://quickstart.spire.io/edge-proxy. Since this identity was created for this proxy, the workload will be able to get this certificate from SPIRE.
Next, the combined validation context will verify the trust_domain, and match_subject_alt_names says to only allow the connection if the certificate presented by the connection has SAN spiffe://quickstart.spire.io/helloworld.
Sidecar
The second Envoy proxy runs in the same pod as a simple helloworld app. All communication to the app will go through the proxy. The full configuration for this proxy can be found here.
See that the backend deployment contains the label spire-discover: helloworld— so this proxy’s registered SPIFFE identity will be:
spiffe://quickstart.spire.io/helloworld
This proxy also has a listener at port 10808, and this time the transport_socket is set on the listener rather than on a cluster. This is important to the flow — the edge proxy is configured to use SPIFFE certificates on its egress to the sidecar, and the sidecar is configured to use SPIFFE certificates on its ingress listener.
transport_socket:
       name: envoy.transport_sockets.tls
       typed_config:
         "@type": type.googleapis.com/envoy.extensions.transport_sockets.tls.v3.DownstreamTlsContext
         common_tls_context:
           tls_certificate_sds_secret_configs:
           - name: spiffe://quickstart.spire.io/helloworld
             sds_config:
               api_config_source:
                 api_type: gRPC
                 grpc_services:
                   envoy_grpc:
                     cluster_name: spire_agent
           combined_validation_context:
             default_validation_context:
               match_subject_alt_names:
                 exact: spiffe://quickstart.spire.io/edge-proxy
             validation_context_sds_secret_config:
               name: spiffe://quickstart.spire.io
               sds_config:
                 api_config_source:
                   api_type: gRPC
                   grpc_services:
                     envoy_grpc:
                       cluster_name: spire_agent
           tls_params:
              ecdh_curves:
               - X25519:P-256:P-521:P-384
The configuration is nearly identical, but the identity name being requested is now spiffe://quickstart.spire.io/helloworld since that is the identity for this proxy, and the match subject alternative names is now spiffe://quickstart.spire.io/edge-proxy since that will be the SAN of the certificate coming from the edge proxy.
The sidecar has a cluster named local, that points to the helloworld app and connects over localhost in the same pod.
Install
Install both deployments:
kubectl apply -f services/edge-deployment.yaml
kubectl apply -f services/backend-deployment.yaml
Once these pods come up (they will be in the default namespace), you should be able to access the deployment via the ingress service deployed as a load balancer in your environment.
Testing
Grab the external IP address for your ingress load balancer from kubectl get svc edge-proxy.
Navigate to http://{external-IP}:10808/ in a browser or via curl, and you should receive the response:
Hello, world!

Version: 1.0.0

Hostname: helloworld-56b5668bc5-tpgkr
If this is the response you receive, you have successfully deployed Envoy proxies to connect using SPIFFE mTLS! If you don’t see this, try some of our troubleshooting tips at Greymatter.
There are a couple of ways to check out what is going on internally, if you port-forward either pod to 8001:8001 , you can curl the Envoy admin endpoint.
curl localhost:8001/config_dumpto see the entire proxy configurationcurl localhost:8001/certsto see the certificates for the proxy — they will be the SPIFFE certificates with that proxies identitycurl localhost:8001/statsto see statistics — grep forsslfor security-specific stats
Final Thoughts
If you’ve made it this far, thanks for following along! Hopefully someone may have found this helpful. Feel free to reach out with thoughts/feedback — I can be found in the Envoy slack.
References
https://blog.markvincze.com/how-to-use-envoy-as-a-load-balancer-in-kubernetes/
